
This post may contain affiliate links. For more details, please see our Affiliate Disclosure .
Of all the breakfast foods in the world, pancakes have always been my weekend love language. But for years, my attempts at making a “healthy” pancake were… let’s just say, disappointing. I was chasing the dream of a perfect whole wheat protein pancake, but they always came out either dense, dry, or with that unmistakable cardboard-like taste.
Then one Saturday morning, I had a thought. What if I treated the batter with a little more patience? I let it rest for a few minutes before hitting the griddle, and I swapped regular milk for tangy buttermilk. The result was nothing short of a miracle. These pancakes were light, fluffy, and packed with a warm, nutty flavor that felt indulgent, not restrictive. They quickly became my go-to recipe, proving that you really can have it all on your breakfast plate.
These aren’t just another breakfast recipe; they are the answer to busy mornings and post-workout cravings when you need something that feels like a treat but works for your body, not against it.
Why This Recipe Works
I could go on and on, but what makes these pancakes a true standout comes down to a few key things:
- Fluffy Texture, Hearty Flavor: Forget everything you think you know about whole wheat pancakes. Using white whole wheat flour gives them a milder, nuttier taste, while the buttermilk and a crucial resting period create an unbelievably light and tender crumb.
- Serious Staying Power: With over 30 grams of protein per serving, these are not the kind of pancakes that will have you reaching for a snack an hour later. They provide sustained energy that will carry you through your morning or refuel you after a tough workout.
- Simple & Forgiving: There are no fancy techniques here. The steps are straightforward, and the batter is incredibly forgiving. It’s a perfect recipe for both seasoned home cooks and anyone just starting their kitchen adventures.
The Ingredients You’ll Need
The magic here is in the combination of simple, wholesome ingredients. Here’s what you’ll need to grab:
- White Whole Wheat Flour: This is my secret weapon! It has all the nutrition of regular whole wheat but with a much lighter texture and milder flavor.
- Vanilla Whey Protein Powder: This boosts the protein significantly and adds a lovely, subtle vanilla sweetness.
- Low-Sodium Baking Powder: Helps the pancakes rise and get fluffy without adding unnecessary salt.
- Cinnamon & Nutmeg: These warm spices are essential for that cozy, comforting flavor. Don’t skip them!
- Egg & Egg Whites: A whole egg adds richness, while the extra whites add lean protein and help with the structure.
- Low-Fat Buttermilk: The acidity in buttermilk reacts with the baking powder to create the fluffiest texture. It’s a non-negotiable for tender pancakes!
- Pure Maple Syrup: Just a touch in the batter for a hint of natural sweetness.
- Avocado Oil: A great neutral-flavored oil for cooking. Melted unsalted butter works well, too.
- Pure Vanilla Extract: It ties all the warm, sweet flavors together.
Step-by-Step Instructions
Ready to make some magic? Here’s how to do it:
- Combine the Wet Ingredients: In a large mixing bowl, whisk together the egg, egg whites, buttermilk, maple syrup, avocado oil, and vanilla extract. Keep whisking until everything is smooth and uniform in color.
- Mix the Dry Ingredients: In a separate, medium-sized bowl, add the white whole wheat flour, protein powder, low-sodium baking powder, cinnamon, and nutmeg. Whisk them together to break up any clumps and ensure everything is evenly distributed.
- Bring Them Together: Pour the dry mixture into the bowl with the wet ingredients. Use a silicone spatula to gently fold everything together until just combined. A few lumps are perfectly fine—do not overmix! Overmixing develops the gluten and will make your pancakes tough.
- Let the Batter Rest: This is the most important step! Set the batter aside, uncovered, for about 8 minutes. This resting period is crucial for the flour and protein to hydrate, which thickens the batter and makes the final pancakes incredibly tender.
- Heat Your Skillet: While the batter is resting, place a large cast-iron or non-stick skillet over medium-low heat. Add a tiny bit of oil or butter, then wipe out the excess with a paper towel. You want a hot, but not scorching, surface.
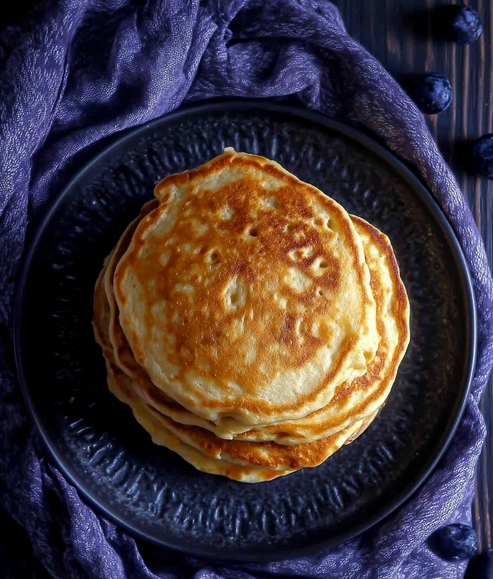
- Cook the Pancakes: Use a ¼-cup measure to pour batter onto the skillet for each pancake. Let them cook for 2-3 minutes on the first side, until you see bubbles forming on the surface and the edges look dry and matte.
- The Flip: Gently slide a thin spatula under each pancake and flip. Cook for another 60-90 seconds on the other side, just until golden brown and cooked through. Transfer to a plate and repeat with the remaining batter.
Expert Tips for Perfect Pancakes
- Storage & Freezing: These pancakes are fantastic for meal prep! Store leftovers in an airtight container in the fridge for up to 3 days. To freeze, let them cool completely, then arrange them in a single layer on a baking sheet. Once frozen solid, transfer them to a freezer bag. They’ll last for up to 2 months and can be reheated in a toaster or microwave.
- Troubleshooting Thick Batter: If your batter seems way too thick after resting (some protein powders are more absorbent than others), simply stir in an extra tablespoon of buttermilk at a time until it’s a thick but pourable consistency.
- Ingredient Swaps: Feel free to use unflavored or even chocolate protein powder, but know it will change the taste. If you don’t have white whole wheat flour, all-purpose will work, but you’ll lose some of the fiber and nutty flavor.
Serving & Pairing Ideas
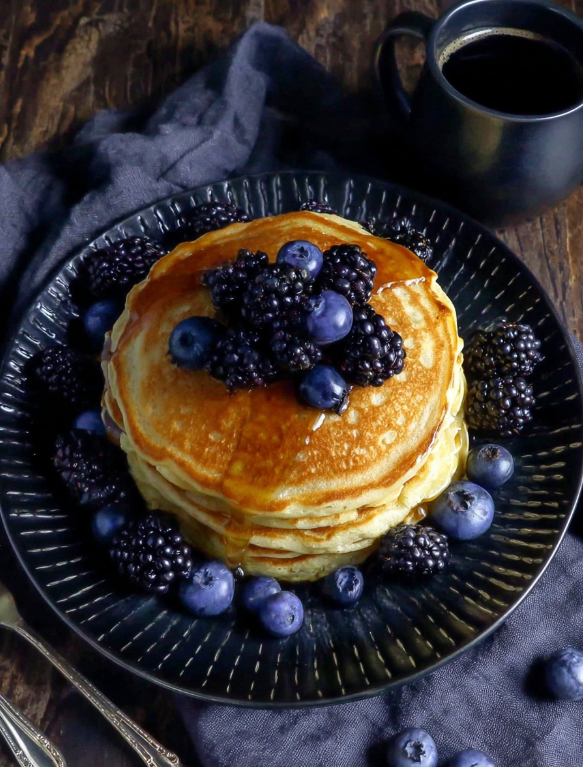
These pancakes are a perfect canvas for your favorite toppings! Here are a few ways we love to serve them:
- The Classic: A small pat of unsalted butter and a warm drizzle of pure maple syrup.
- Fresh & Fruity: A generous handful of fresh berries, sliced bananas, or a spoonful of warm fruit compote.
- Protein Power-Up: A dollop of plain Greek yogurt or cottage cheese for even more protein and a creamy, tangy contrast.
- A Touch of Crunch: Sprinkle on some toasted pecans, walnuts, or slivered almonds.
They are absolutely perfect for a slow weekend brunch with a hot cup of coffee or as a quick, satisfying meal any day of the week.

Wholesome Vanilla Protein Pancakes
Ingredients
Dry Goods
- 1 ⅓ cups 160 g White whole wheat flour
- 3 scoops approx. 90 g Vanilla-flavored whey protein powder (select a low-sodium, low-sugar variety)
- 1 tbsp Low-sodium baking powder potassium-based; essential for DASH compliance
- 1 tsp Ground cinnamon
- ¼ tsp Ground nutmeg
Proteins & Liquids
- 1 large Egg lightly beaten
- 2 large Egg whites
- 1 ½ cups 360 ml Low-fat buttermilk (1%)
- 1 tbsp Pure maple syrup
- 2 tbsp Avocado oil plus a small amount for the skillet
- 1 tsp Pure vanilla extract
Optional Garnish
- Fresh berries strawberries, blueberries, or raspberries
- Almond butter or Greek yogurt
- Light drizzle of pure maple syrup use sparingly
Instructions
- Awaken the Liquids: In a large mixing bowl, combine the whole egg, egg whites, low-fat buttermilk, 1 tablespoon of maple syrup, avocado oil, and vanilla extract. Whisk gently until the mixture is uniform in color and consistency.
- Sift the Powders: In a separate medium bowl, add the white whole wheat flour, vanilla protein powder, low-sodium baking powder, cinnamon, and nutmeg. Use a whisk to thoroughly combine the dry ingredients and break up any clumps in the protein powder.
- Marry the Mixtures: Pour the dry powder mixture into the bowl with the wet ingredients. Using a silicone spatula, fold the ingredients together until just moistened. Do not overmix; a few small lumps in the batter are expected and help keep the texture light.
- Hydrate the Batter: Set the prepared batter aside, uncovered, for 8 minutes. This resting period allows the whole wheat flour and protein powder to fully absorb the liquids, resulting in a thicker, more tender pancake.
- Prepare the Cooking Surface: While the batter rests, place a large, heavy-bottomed skillet over medium-low heat. Add a very thin layer of avocado oil, wiping out any excess with a paper towel. The surface is ready when a drop of water sizzles and evaporates on contact (approx. 350°F / 175°C).
- Cook the Pancakes: Using a ¼-cup measure, pour the batter onto the preheated skillet to form rounds, leaving space between each. Cook for 2 to 3 minutes on the first side, or until bubbles appear across the surface and the edges look dry and matte.
- The Final Flip: Carefully slide a thin spatula underneath each pancake and flip. Cook the second side for an additional 60 to 90 seconds, just until cooked through and golden brown. Transfer to a plate and repeat with the remaining batter.
- Plate and Serve: Serve immediately while warm. Top with fresh berries and a small dollop of almond butter or a minimal drizzle of syrup if desired.
Notes
- Critical Ingredient: It is vital to use Low-Sodium Baking Powder (often labeled as sodium-free or potassium-based). Standard baking powder contains high levels of sodium that would exceed DASH guidelines for this recipe.
- Flour Texture: White whole wheat flour is used because it provides the fiber and nutrients of whole grains but with a milder flavor and lighter color than red whole wheat, maintaining the classic pancake appearance.
- Storage: Leftovers store well in the refrigerator for up to 3 days. To freeze, arrange cooled pancakes in a single layer on a baking sheet until solid, then transfer to a freezer-safe bag for up to 2 months. Reheat in a toaster.
- Calories: 365 kcal
- Total Fat: 10 g
- Saturated Fat: 2 g
- Sodium: 185 mg
- Potassium: 650 mg
- Total Carbohydrate: 38 g
- Dietary Fiber: 5 g
- Total Sugars: 9 g (approx. 4g Added Sugars)
- Protein: 30 g
- Calcium: 150 mg
- Magnesium: 50 mg
You’ve Got to Try These!
I truly believe this recipe will change the way you think about healthy pancakes. They’re hearty, delicious, and so simple to whip up.
If you give them a try, I’d love to see them! Snap a photo and tag me on social media. Happy cooking!


Kristina Hanson is an independent wellness researcher and the founder of DailyZests. After a PCOS diagnosis, she focused her research on managing insulin resistance through evidence-based nutrition. Her work translates the science of DASH, Mediterranean, and Low-Carb eating into easy, family-tested recipes.

